Ads

Tuesday, 17 September 2013

Using static resource Dynamically in Salesforce?

Let’s suppose we have an archive in static resource with name “Contact” and you want to use this static resource on a page that displays Contact Photos dynamically. Assumption is that the images are stored with same name as product codes.
Code:

//Declare an apex variable which gets the Contact code from an apex property
<apex:variable var="contact_photo" value="{!contactPhoto}.jpg"/>
<img src="{!URLFOR($Resource.Products,contact_photo)}')" alt="" />

Email Services in Salesforce?

Email services are automated processes that use the Apex classes to process the contents, headers, and attachments of inbound email.
For example, you can create an email service that automatically creates contact records based on contact information in messages. Each email service has one or more email service addresses that can receive messages for processing.
To use the email services, click Your Name ➤ Setup ➤ Develop ➤ Email Services.
Given below email service class inserts Contact which is declare in setting of Email Services.

Class for Email Services:
global class ProcessJobApplicantEmail implements Messaging.InboundEmailHandler {

  global Messaging.InboundEmailResult handleInboundEmail(Messaging.InboundEmail email,
    Messaging.InboundEnvelope envelope) {

    Messaging.InboundEmailResult result = new Messaging.InboundEmailresult();

    Contact contact = new Contact();
    contact.FirstName = email.fromname.substring(0,email.fromname.indexOf(' '));
    contact.LastName = email.fromname.substring(email.fromname.indexOf(' '));
    contact.Email = envelope.fromAddress;
    insert contact;

    System.debug('====> Created contact '+contact.Id);

    if (email.binaryAttachments != null && email.binaryAttachments.size() > 0) {
      for (integer i = 0 ; i < email.binaryAttachments.size() ; i++) {
        Attachment attachment = new Attachment();
        // attach to the newly created contact record
        attachment.ParentId = contact.Id;
        attachment.Name = email.binaryAttachments[i].filename;
        attachment.Body = email.binaryAttachments[i].body;
        insert attachment;
      }
    }
     return result;
  }
}

Test Class for Email Service:
@isTest
private class EmailTest{
static testMethod void testMe() {

  // create a new email and envelope object
  Messaging.InboundEmail email = new Messaging.InboundEmail() ;
  Messaging.InboundEnvelope env = new Messaging.InboundEnvelope();

  // setup the data for the email
  email.subject = 'Test Job Applicant';
  email.fromname = 'FirstName1 LastName1';
  env.fromAddress = 'raees.sabir@accenture.com';

  // add an attachment
  Messaging.InboundEmail.BinaryAttachment attachment = new Messaging.InboundEmail.BinaryAttachment();
  attachment.body = blob.valueOf('my attachment text');
  attachment.fileName = 'textfile.txt';
  attachment.mimeTypeSubType = 'text/plain';

  email.binaryAttachments =
    new Messaging.inboundEmail.BinaryAttachment[] { attachment };

  // call the email service class and test it with the data in the testMethod
  ProcessJobApplicantEmail emailProcess = new ProcessJobApplicantEmail();
  emailProcess.handleInboundEmail(email, env);

  // query for the contact the email service created
  Contact contact = [select id, firstName, lastName, email from contact
    where firstName = 'FirstName1' and lastName = 'LastName1'];

  System.assertEquals(contact.firstName,'FirstName1');
  System.assertEquals(contact.lastName,'LastName1');
  System.assertEquals(contact.email,'raees.sabir@accenture.com');

  // find the attachment
  Attachment a = [select name from attachment where parentId = :contact.id];

  System.assertEquals(a.name,'textfile.txt');
 }
}

How to use apex variable for total records in Visualforce?

Scenario:

 I came across a issue where visualforce does not allow one to Count or Sum records in a page.
One solution would be to add more code to the controller to do a count of the records. Which is ok.
A simple solution is to use the apex variable function in Visualforce.

Solution:
Lets do it off Contacts
In your Apex Controller : Create a SOQL query as is:
public class countcontroller{
            public List<Contact> queryResult {get;private set;}
            public String qryString {get;set;}
            public PageReference query(){
            qryString =  'SELECT Name, Email, Phone from Contact';
            queryResult = Database.query(qryString);
             return null;
       }
}

Pretty Simple and Straight Forward.
Now for the VF Page and Magic:
You will see I use the apex variable function to do a couple of things:

create a variable run the query inside that variable counting all the records by 1 within a repeat tag calling the variable with the total Kind of like a for Loop but in Visualforce instead of controller.

<apex:page standardcontroller="Contact" extensions="countcontroller">
<table width="95%" border="0" align="center" cellpadding="0" cellspacing="0">
<tr height="5">
    <td width="35%" class="outsideround_head" align="right">
        Total Contacts Returned:&nbsp;
    </td>
    <td width="8%" class="outside_round_head_value">
        <apex:variable var="call" value="{!0}" />
        <apex:repeat var="countitall" value="{!queryResult}" >
        <apex:variable var="call" value="{!call+1}"/>
        </apex:repeat>
        <apex:outputText value="{!call}"/>
    </td>
</tr>
</table>
</apex:page>

GROUP BY - Count Method in Apex Controller?

Scenario:

We Need to do Total of Opportunities  Based on Stages. 

Thought Process:
What are the columns involved? Answer: StageName and Count or Total
What methods will we utilize to achieve these results? Answer: Group By SOQL Statement with Count.
What UI to built this neat logic? Answer: Apex Controller and VisualForce Page
Need to achieve this type of reporting for the user:


Solution:
Use Eclipse IDE or SOQL Explorer to create your SOQL Statement.
SELECT StageName, Count(Name) ce FROM Opportunity GROUP BY StageName
Second create  Apex Controller name what you like I named it TTL_Lesson, with your logic
public class TTL_Lesson{
public class OppStageHolder {
    public String OPP {get; set;}
    public Integer TTL_Opp {get; set;}
public OppStageHolder (){}
}
//Results will be placed within this List
public List queryResults{ get; set; }

//Your Page
public PageReference TTL() {

AggregateResult[] groupedResults = [SELECT StageName,
     Count(Name) ce FROM Opportunity
     GROUP BY StageName];
System.Debug('zzavg ' + groupedResults.size());
//Define your List
queryResults = new List();

for (AggregateResult ard : groupedResults)  {  
    OppStageHolder myObject = new OppStageHolder();  
    myObject.OPP = String.valueOf(ard.get('StageName'));  
    myObject.TTL_Opp = (Integer) ard.get('ce');      
    queryResults.add(myObject);  
}
return Page.TTL;
}

}

Now create your VF Page to call this and display it whenever the user clicks on this page:

<apex:page controller="TTL_Lesson" action="{!TTL}" showHeader="false" sidebar="false">
    <apex:dataTable value="{!queryResults}" var="a" id="theTable" border="2" cellpadding="1" cellspacing="1" bgcolor="#A9D0F5" >
                <apex:column >
                        <apex:facet name="header">Stage</apex:facet>
                        <apex:outputText value="{!a.OPP}"/>
                </apex:column>              
                <apex:column >
                        <apex:facet name="header">&nbsp;&nbsp;&nbsp;Count</apex:facet>
                        <apex:outputText value="{!a.TTL_Opp}"/>
                </apex:column>
    </apex:dataTable>
</apex:page>

Friday, 23 August 2013

Winter ’14 Release Developer Preview

Summer is fading and fall will soon be here. Question: do you know what the best part of fall is? That’s right, the winter release of Salesforce.com. The Winter ’14 release of Salesforce.com is right around the corner and that means once again I get the distinct pleasure of reviewing some of the new developer features that have been added. There are a large number of new features in the Winter ’14 release that developers will enjoy and in this post I’ll highlight a few of, what I feel, are the more pertinent points that developers will be interested in.

Visualforce:
The enhancements to Visualforce in this release are around improving the developer experience of building HTML5 apps along with some other core improvements and new tools.
• <apex:input>is a new, HTML5-friendly, general purpose input component that adapts to the data expected by a form field. It uses the HTML type attribute to allow client browsers to display type-appropriate user input widgets,
• The HTML5<datalist>element specifies a list of auto-complete options to associate with an <input type=”text” /> element.
• A Visualforce page’s view state can be viewed now in the developer console.
• We’re piloting a new feature that allows a Visualforce page’s view state to be stored on the server rather than the client thus preventing the need to send it back and forth with each request and response. This could help improve performance where low bandwidth or high latency could cause problems (think mobile). As with most features we release in pilot, you’ll need to request to have this one activated.

Sandboxes:
We’re making some interesting changes to sandboxes in this release as well. These changes significantly help with testing and life cycle management. I think developers will also like the data limits increase.
• Configuration Only sandboxes have been renamed to Developer Pro sandbox and the storage limit on them has been increased to 1GB.
• Developer Sandboxes have had their storage limit increased to 200MB.

Developer Console:
As always with each release we try to make it easier to manage the code in your applications. We’ve continued that with some of the following additions to the Developer Console.
• You can now create and edit JavaScript, XML, CSS and plain text in static resources with the Static Resource Editor. If you’ve ever managed static resources I’m sure you’ll agree with me that this is one of those hallelujah features that developers are going to use a lot.
• We’ve included a history panel that lists the last ten SOQL queries making query reuse easier. Also worth noting is the query editor now supports SOSL as well.

**UPDATE**

It was brought to my attention after I posted this that I forgot one of the cooler enhancements to the Developer Console. We now can search across the entire codebase. There’s a flow-diagram view of a transaction, which shows how workflow and triggers are timed relative to one another. This will be tremendously helpful in debugging complex or large code bases. This can also be used with declarative and programatic logic.

**

Apex Code:
As usual we’ve continued adding features to and improving on the world’s first cloud programming language. There are a ton of additions to Apex. Here are a just a few.
• There is no more code statement limit. Although we’ve removed this limit, we haven’t removed the safety mechanism it provided. Instead we’ve limited the CPU time for transactions. The limits are now 10,000ms for synchronous Apex and 60,000ms for asynchronous Apex.
• The Topic and Topic Assignment objects now support triggers.
• New Database methods improve record merging functions.

API:
I think the biggest announcement that developers have been waiting for API wise is the availability of our Analytics API. We introduced a limited pilot in summer 13 and now the Analytics REST API is generally available. The Analytics API lets you integrate Salesforce report data into your apps programmatically and has several resources that let you query metadata, and record details. Not to be outdone, the team has also added features to the REST API, SOAP API, Metadata API, Streaming API, Bulk API and the Tooling API. A big change here is the introduction of flexible limits for both the SOAP and REST API. Flexible limits allow you to excede API request limit by up to 50% within the limit timeframe.

Miscellaneous Updates:
I’ve created this last category to lump a few things together that don’t really fit anything I’ve mentioned above nor are there enough of to warrant a separate category of their own.
• Have you ever been stymied by or frustrated by the fact you couldn’t use the User object in workflow? Well be frustrated no more, there’s a new beta feature that allows the User object to be used in workflow rules.
• Advanced setup search is now beta. With it enabled you can search for Setup pages, custom profiles, permission sets, public groups, roles, and users from the sidebar in Setup.
• We introduced the custom state and country picklist beta in summer 13. They’re now generally available.


Thursday, 22 August 2013

Salesforce converted currency in report?

In Salesforce, there is a field type "currency", as a standard field for example Amount in Opportunity, and we can create custom field with data type is currency.

If you enable multi-currency in your Salesforce instance, if the currency is not in the Corporate currency, you will find the corporate currency show in parenthesis after the amount.

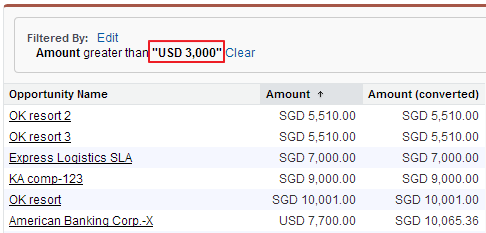
In report, you will find (converted) field for each currency field. You can add it into report as other normal field. But, you cannot add converted field as report filter (as of now).

Solution: use original currency as filter and add currency code. Example: USD 300, SGD 500, JPY 10,000 and etc.


How to calculate date for weekday and weekend only In Salesforce?

In Salesforce, it is easy to calculate number of day between 2 date.
Just create a formula field, example: End_Date__c - Start_Date__c. DONE!!!

But, is it possible to find out only weekday and only weekend between 2 date?
Hmmm.... most of us will think about Apex Trigger.
Yes, it is correct solution, apex trigger able to calculate without issue, but, if you are not from developer, you need a developer for this.

Wait a minute.... Can we use 'just' formula to calculate weekday and weekend?

YES, it is possible with complex formula. Here we go:

To calculate Weekday
CASE(MOD( Request_Date__c - DATE(2007,1,1),7),
0 , CASE( MOD( Execution_Date__c - Request_Date__c ,7),1,2,2,3,3,4,4,5,5,5,6,5,1),
1 , CASE( MOD( Execution_Date__c - Request_Date__c ,7),1,2,2,3,3,4,4,4,5,4,6,5,1),
2 , CASE( MOD( Execution_Date__c - Request_Date__c ,7),1,2,2,3,3,3,4,3,5,4,6,5,1),
3 , CASE( MOD( Execution_Date__c - Request_Date__c ,7),1,2,2,2,3,2,4,3,5,4,6,5,1),
4 , CASE( MOD( Execution_Date__c - Request_Date__c ,7),1,1,2,1,3,2,4,3,5,4,6,5,1),
5 , CASE( MOD( Execution_Date__c - Request_Date__c ,7),1,0,2,1,3,2,4,3,5,4,6,5,0),
6 , CASE( MOD( Execution_Date__c - Request_Date__c ,7),1,1,2,2,3,3,4,4,5,5,6,5,0),
999)
+ (FLOOR(( Execution_Date__c - Request_Date__c )/7)*5)
-1

To calculate Weekend
CASE(MOD( Request_Date__c - DATE(2007,1,1),7),
0 , CASE( MOD( Execution_Date__c - Request_Date__c, 7),1,0,2,0,3,0,4,0,5,1,6,2,0),
1 , CASE( MOD( Execution_Date__c - Request_Date__c, 7),0,0,1,0,2,0,3,0,4,0,5,2,2),
2 , CASE( MOD( Execution_Date__c - Request_Date__c, 7),0,0,1,0,2,0,3,1,2),
3 , CASE( MOD( Execution_Date__c - Request_Date__c, 7),0,0,1,0,2,1,2),
4 , CASE( MOD( Execution_Date__c - Request_Date__c, 7),0,0,1,1,2),
5 , CASE( MOD( Execution_Date__c - Request_Date__c, 7),0,1,2),
6 , CASE( MOD( Execution_Date__c - Request_Date__c, 7),6,2,1),
999)
+ (FLOOR(( Execution_Date__c - Request_Date__c )/7)*2)

If you see in formula above, we have DATE(2007,1,1), this is refer to 1-Jan-2007 is Monday. So, you can use any date which is Monday, example 1-Jan-1900
How to undelete records in Salesforce?

Salesforce keep record you delete to Recycle Bin for 15 days with maximum record of 25 times the Megabytes (MBs) in your storage. For example, if your organization has 1 GB of storage then your limit is 25 times 1000 MB or 25,000 records. If your organization reaches its Recycle Bin limit, Salesforce automatically removes the oldest records if they have been in the Recycle Bin for at least two hours.

You can manually undelete records by click Recycle Bin icon in bottom left menu. Undelete account will include contact, case, opportunity tagged to that Account. But, if you have many records or you have specific record Id or you want to undelete records with some conditions, manually delete is not an option, use Apex code for it.

You not really need to be good developer to utilize Apex code. Here we go:

1. Open Developer Console
From your name in top right, look for Developer Console


2.From Developer Console
Go to Debug menu and select Open Execute Anonymous Window


3. Enter SOQL 
Example:
Account[] a = [SELECT Id FROM Account WHERE name = 'singtel' ALL ROWS];
undelete a;
Important to add ALL ROWS, otherwise deleted records will be not return on query.


4. Monitor Apex Debug Log
Go to Monitor - Logs - Debug Logs (in Salesforce menu, not Developer console)
Add user to monitor, default it will capture 20 log request for the users

5. Execute 
Click Execute button in Enter Apex Code window

6. Back to Debug Log
Select latest debug log and click View to monitor

ISBLANK() or ISNULL() in Salesforce?

To determine if an expression has a value or not, you can use ISBLANK() function in Salesforce. It will  returns TRUE if it does not and if it contains a value, this function returns FALSE. You can use this function in formula field, as well as in workflow.

ISBLANK(expression) and replace expression with the expression you want evaluated.
sample:
IF(ISBLANK(Maint_Amount__c), 0, 1)

A field is not empty if it contains a character, blank space, or zero. For example, a field that contains a space inserted with the spacebar is not empty.

If you use this function with a numeric field, the function only returns the specified string if the field does not have a value and is not configured to treat blank fields as zeroes.

You also can use BLANKVALUE() function to determine if an expression has a value and returns a substitute expression if it does not. If the expression has a value, returns the value of the expression.
sample:
BLANKVALUE(Payment_Due_Date__c, StartDate +5)
Use the same data type for both the expression and substitute_expression.

How about ISNULL() ?
Use ISBLANK instead of ISNULL in new formulas. ISBLANK has the same functionality as ISNULL, but also supports text fields. Salesforce will continue to support ISNULL, so you do not need to change any existing formulas.

The same goes for NULLVALUE(), it is similar with BLANKVALUE(), with exception:

Avoid using NULLVALUE with text fields because they are never null even when they are blank. Instead, use the BLANKVALUE function to determine if a text field is blank.
Don’t use NULLVALUE for date/time fields.

Choose Treat blank fields as blanks for your formula when referencing a number, percent, or currency field. Choosing Treat blank fields as zeroes gives blank fields the value of zero so none of them will be null.

Wednesday, 21 August 2013

How to Customize the Lead Conversion Process in Salesforce.com?

trigger lead_onConvert on Lead (after update) {

/*  Create variables to store the lead values,new and old.  This will be used below to determine if the leads are being converted,  not converted yet, or has already been converted.*/

List<Lead> newLeads = trigger.new;
Map<Id, Lead> mOldLeads = trigger.oldMap;
Lead oldLead;

/* Create sets of Ids to store the records associated with the converted leads */

Set<Id> convertedAccountIds = new Set<Id>();
Set<Id> convertedContactIds = new Set<Id>();
Set<Id> convertedOpportunityIds = new Set<Id>();

/* Loop through the leads submitted through this trigger.  Populate the appropriate sets of Ids for each lead with populated values.*/

for (Lead l : newLeads) {

if (l.convertedAccountId != null) {
convertedAccountIds.add(l.convertedAccountId);
}

if (l.convertedContactId != null) {
convertedContactIds.add(l.convertedContactId);
}

if (l.convertedOpportunityId != null) {
convertedOpportunityIds.add(l.convertedOpportunityId);
}
}

/* Extract the records associated with each set of Ids populated above.  Once the data has been extracted store it in a map so it can efficiently be referenced
 in the main loop below.*/

List<Account> accounts =[SELECT Id, Name FROM Account WHERE Id IN : convertedAccountIds];

Map<Id, Account> mAccounts = new Map<Id, Account>(accounts);

List<Contact> contacts =[SELECT Id, Name FROM Contact WHERE Id IN : convertedContactIds];

Map<Id, Contact> mContacts = new Map<Id, Contact>(contacts);

List<Opportunity> opportunities =[SELECT Id, Name FROM Opportunity WHERE Id IN : convertedOpportunityIds];

Map<Id, Opportunity> mOpportunities = new Map<Id, Opportunity>(opportunities);

/* Create lists of records to be updated in bulk at the end of this trigger.  We use a separate list to ensure we aren't updating records that are  not affected by this trigger. */

List<Account> updateAccounts = new List<Account>();
List<Contact> updateContacts = new List<Contact>();
List<Opportunity> updateOpportunities = new List<Opportunity>();

/*
* MAIN LOOP
*
* Loop through all leads submitted through this trigger.
* If this trigger was executed because of a conversion
* we will populate the related records.
*/
for (Lead newLead : newLeads) {

// Get a reference to the old values associated
// with this lead.
oldLead = mOldLeads.get(newLead.Id);

// Determine if the lead was converted or not.
// If the previous status was not converted and
// the current status is converted, then this
// trigger executed because of a conversion.
if (!oldLead.IsConverted && newLead.isConverted) {

// ** CONVERSION FOUND **

Account account = mAccounts.get(newLead.convertedAccountId);
// Make appropriate updates here.
updateAccounts.add(account);

Contact contact = mContacts.get(newLead.convertedContactId);
// Make appropriate updates here.
updateContacts.add(contact);

Opportunity opportunity = mOpportunities.get(newLead.convertedOpportunityId);
// Make appropriate updates here.
updateOpportunities.add(opportunity);

}
}

/* Update the records for any update list  populated with records.*/

if (updateAccounts.size() > 0) {
update updateAccounts;
}

if (updateContacts.size() > 0) {
update updateContacts;
}

if (updateOpportunities.size() > 0) {
update updateOpportunities;
}
}

How We can get the list of contacts and accounts converted from leads on a particular Date?

We can get the list of contacts and accounts converted from leads on a particular Date

Actually everyone thinks it's impossible to find Solution,But after a lot of research I found a way for this:

Run a Report on Account History/ Contact History with a Specified date and Add the Filter Field/Event set to Created by Lead Covert to find the records that were created upon lead conversion, or set to Lead Converted to Contact to find the records that already exist and merged with lead conversion.


Tuesday, 20 August 2013

Phone Number validation In Salesforce?

Converting 10-Lines of Apex code to a 1-line Validation Rule Formula
Code clean-up is what I'm doing these days ... lots of code clean-up. One of our Salesforce.com orgs (we have sixteen of them) currently has 72% test coverage in production. I'm not sure how the previous administrators were able to install code below the 75% threshold, but they managed. I'm tasked with getting that code cleaned up, so I can deploy a new release.

While looking for areas to improve code coverage, I stumbled upon this trigger:

trigger checkAccountPhoneNumberBiBu on Account (before insert, before update) {
   for (Account account : Trigger.new) {
      if (account.Phone==null) continue;
      Pattern p = Pattern.compile('[-() ]');
      String sPhone = p.matcher(account.Phone).replaceAll('');
      // check length without punctuation
      if (sPhone.length() != 10) account.Phone.addError(' Phone number must have 3 digit area code and 7 digit number');
      p = Pattern.compile('\\d');
      sPhone = p.matcher(sPhone).replaceAll('');
      if (sPhone.length() > 0) account.Phone.addError('Phone number must be formatted as (999)999-9999');
   }
}

This trigger looks at the value entered in the "Phone" field before an Account record is inserted or updated; if the phone field is not in the (999)999-9999 format, it errors out and notifies the user to enter the phone # in the proper format.

In addition to this Apex code, the developer also had to write a testmethod to ensure coverage of the trigger. His code was only getting 67% test coverage (which is what brought the trigger to my attention in the first place).

As I started looking at what I needed to add to the testmethod to ensure 100% coverage, I realized it would be easier to just get rid of the trigger altogether, and replace it with a Validation Rule. That 10 lines of Apex code was reduced to a 1-line formula in a validation rule:

NOT(REGEX(Phone, "\\D*?(\\d\\D*?){10}"))

Standard profiles in Salesforce?


Standard profiles cannot be deleted and permissions cannot be edited.


Thursday, 1 August 2013

Using Rerender to Render — One Solution for Headaches?

It's a regular occurrence to have an <apex:outputPanel> or similar element in a Visualforce page, where you want to toggle visibility of said element according to some variable. Something that's caught both myself and fellow teammates out on a few such occasions is finding that it just won't appear again after being removed from the screen, when the page code looks analogous like the following.

<apex:outputPanel id="thePanel" rendered="{!bRenderThePanel}">
    <!-- Content -->
</apex:outputPanel>

<apex:commandButton action="{!DoSomeCalcs}" rerender="thePanel" value="FIRE!"/>

In this example, the action DoSomeCalcs is implemented such that it will toggle the value of the variable bRenderThePanel and so the result should be that the panel is alternately displayed and hidden with each click of the button. Woe is the developer, as this is not the case. Chances are you'll find yourself confused as to why it just won't reappear (or appear in the first place).

Essentially re-rendering a specified panel (or other component) that is not currently displayed will fail, and the solution is to wrap it with a component that is always present, using that as the target for the re-render. Thus our example becomes:

<apex:outputPanel id="thePanelWrapper">
    <apex:outputPanel rendered="{!bRenderThePanel}">
        <!-- Content -->
    </apex:outputPanel>
</apex:outputPanel>

<apex:commandButton action="{!DoSomeCalcs}" rerender="thePanelWrapper" value="FIRE!"/>

What does seem strange to me is that Salesforce have specifically ensured that you can access DOM elements within an <apex:outputPanel> when it's not displayed, as indicated by the documentation for the layout attribute, it seems odd that this functionality does not carry over for the element itself when it's being used as a re-render target.

The layout style for the panel. Possible values include "block" (which generates an HTML div tag), "inline" (which generates an HTML span tag), and "none" (which does not generate an HTML tag). If not specified, this value defaults to "none". However, if layout is set to "none", for each child element with the rendered attribute set to "false", the outputPanel generates a span tag, with the ID of each child, and a style attribute set to "display:none". Thus, while the content is not visible, JavaScript can still access the elements through the DOM ID.

Happy coding!

Tuesday, 30 July 2013

AggregateResult in Salesforce?

AggregateResult in Salesforce is used to find Sum, Min, Max and Avg. It is similar to Aggregate function in SQL.

Using Aggregate Result, we cannot fetch data. It is mainly used to find Sum, Min, Max and Avg.

Sample Code:

Visualforce page:

<apex:page controller="Sample" sidebar="false" action="{!show}">
<apex:pagemessages />
<apex:form >
    <apex:pageBlock >
        <apex:pageblockTable value="{!SummaryList}" var="r">          
            <apex:column headerValue="Account Name" value="{!r.AcctName}"/>
            <apex:column headerValue="Number of Contacts" value="{!r.Total}"/>
        </apex:pageblockTable>
    </apex:pageBlock>
</apex:form>
</apex:page>

Apex Controller:

public with sharing class Sample {
    public List<AggregateResult> Result {get;set;}  
    public List<Summary> SummaryList {get;set;}
    public List<Account> AcctList;
    public Map<Id, Account> IdAccount;
    List<Id> Ids;
   
    public void show() {
        SummaryList = new List<Summary>();
        Result = new List<AggregateResult>();
        Ids = new List<Id>();
        AcctList = new List<Account>();
        IdAccount = new Map<Id, Account>();
       
        Result = [SELECT Count(Id) Total , AccountId FROM Contact GROUP BY AccountId];              
       
        for(AggregateResult a : Result) {  
            Ids.add((Id)a.get('AccountId'));
        }
       
        AcctList = [SELECT Name FROM Account WHERE Id IN : Ids];
       
        System.debug('Account List' + AcctList);
       
        for(Account a : AcctList) {
            IdAccount.put(a.Id, a);          
        }
       
        System.debug('Ids and Accounts are ' + IdAccount);
               
        for(AggregateResult a : Result) {
            Account TempAcct = new Account();          
            TempAcct = IdAccount.get((Id)(a.get('AccountId')));
            system.debug('Account Name is ' + TempAcct.Name);
            SummaryList.add(new Summary(a, TempAcct.Name));              
        }  
    }
   
    public class Summary {
        public Integer Total {get;set;}
        public String AcctName {get;set;}
       
        public Summary(AggregateResult a, String AccountName) {
            Total =  (Integer)a.get('Total');
            AcctName = AccountName;
        }
    }
}
 output:


Sunday, 21 July 2013

Javascript to select all checkboxes in visualforce page?

I needed to develop a custom visualForce page which would hold a page block table which would contain a checkbox and details of a custom object based on which user can select and click on buttons to perform some operations.

I wrapped the custom object record and check box in a wrapper class. I needed a simple functionality when the header checkbox is selected or deselected accordingly all the checkbox will get selected or deselected accordingly. So i looked into community and first result community gave is this(controller way). It involved calls to back end and as a result functionality is little slow.

So I went for a Javascript solution which would provide a faster,elegant and much simpler way.Here is the VF code which was used in the page above.
<apex:pageBlockTable value="{!wrapreportsobj }" var="w" id="Selected_PBS">
<apex:column ><apex:facet name="header">
<apex:inputCheckbox onclick="checkAll(this,'checkedone')"/>
</apex:facet>
<apex:inputCheckbox value="{!w.selected}" id="checkedone"/></apex:column>
<apex:column ><apex:facet name="header">Id</apex:facet><apex:outputfield value="{!w.rep.id}"/></apex:column>
<apex:column ><apex:facet name="header">Name</apex:facet><apex:outputfield value="{!w.rep.name}"/></apex:column>
</apex:pageBlockTable>

Note that I have set the id of the checkbox as checkedone and while clicking on header checkbox it calls a javascript function  checkAll. Giving an id will segregate all the checkboxes in the table. Here is the javascript which would handle the selecting and deselecting all of the checkboxes which has id checkedone in it.

<script type="text/javascript">
    function checkAll(cb,cbid)
        {
            var inputElem = document.getElementsByTagName("input");                    
            for(var i=0; i<inputElem.length; i++)
            {            
                 if(inputElem[i].id.indexOf(cbid)!=-1){                                      
                    inputElem[i].checked = cb.checked;
                }
            }
        }
</script>

Loading products , pricebooks and pricebook entry?

There is always a need to load Products into salesforce. Its a 3 step process to load products and associate them with pricebook . There is a standard pricebook which salesforce provides by default which can be deactivated. There is also an option to create custom pricebook as many as you want in accordance with the business.


Fields in red are required and fields in blue are read only


Pricebookentry is the junction object between product2 and pricebook2 object( For strange reasons they have suffix 2 for standard object) . It has lookup for product2 and pricebook2 field through product2id and pricebook2id field. Name and productcode is copied over from product2 based on product2id field.

Essentially for loading Products you need to load product2 table first. Create a CSV file. Name is the only required field. Optionally have columns for other fields indicated in the pic.set Isactive to true. use dataloader to insert data. Get the id of the products from success file which got created.

Pricebook2 will also have only Name as required field. Isstandard indicates whether its a standard or custom and its readonly. Also Isactive should be set to true if you are planning to use it. Get the Pricebook2id from success file. Alternatively export pricebook2 table to get id of pricebook already created.

Final step is to create pricebookentry. Pricebook entry needs to be created for each Pricebook.
populate ids of product2 in product2id column and pricebook2 in pricebook2id column. Unitprice is a required field where the price for this pricebook is set. Pricebook entry for a custom pricebook cannot be made if that product is not there in the standard pricebook.

Unitprice can be made read only if usestandardprice field is set to true. This can be made only for custom pricebook and when the product is added to standard pricebook. So the unitprice set in standard pricebook will be carried over to the custom pricebook. Make Isactive true whenever u are planning to use it. Use dataloader to insert the pricebookentry. you have to repeat the above 2 steps for each custom pricebook.If you have multiple currencies enabled there should be as many pricebook entry records for a single product in a pricebook for each currency.

Tuesday, 16 July 2013

Salesforce.com - Reference to tools and resources - All in one place

Everytime i need to install a administrative tool or if i need tutorials or references, i found that i spend a considerable amount of time in locating them... As a result, this article came to my mind..

Here, you will find links to some of the administrative tools in Salesforce.com as well as less-known good resources..

This list would be updated as and when i find new resources.. So, make sure you bookmark this page :-)

Salesforce objects, fields and their usage - Complete description

This is the official WebServices Developer's guide but has enough information that you would want to know about Salesforce objects, how to use them etc through the API. 
Click here

Excel Connector for Salesforce.com

Sforce Connector - 
Click here

Office toolkit 3.0 - 
Click here

Please note that Office toolkit 4.0 is installed automatically when you install the Outlook connector for Salesforce....

Apex Explorer

Installation guide and notes - 
Click here

Installation file - 
Click here to download


Apex Data Loader

Installation guide and notes - 
Click here

Running the Apex Data Loader from the command prompt: Click here
Running the Apex Data Loader from the command prompt (Simplified) : Click here

SFDC Web to anything -

You might have heard about web to Case, web to anything lets you to create records in any object through a web form..

You can find the code, screenshots and description here - 
Click here

iGoogle like Salesforce Home Page (iSalesforce)

The project source and a demonstration are hosted here. 
Click here

Tutorials and guides -

The official salesforce.com guide's and tutorial's page - 
Click here

Discussion forums -


The official salesforce.com community forums - 
Click here

insufficient_access_on_cross_reference_entity APEX / Salesforce

Even though i understood what this means and have dealt with it earlier, this time this error message sucked my brain for one week. Finally, i got it sorted out and i hope this post helps someone understand and solve as well.

When does this error happen?
This error normally happens when a DML operation is performed. Meaning that, whenever an Insert or Update is performed. You won't see this error when you save your APEX class or TRIGGER, because this error happens at RUNTIME.

What does this error mean?
This error means that you are trying to do an operation which is not supposed to be done, or the operation you are about to perform is not permitted according to the Sharing and Security settings defined. This error message does NOT always mean that you lack access to do the operation, even though it might be the case sometimes. So, even if you are an ADMINISTRATOR you may get this message.

Possible Causes:
Let's take some scenario's and analyze.

 Scenario 1:  Creating a new record (Account/Contact/...) and setting the Owner. Applies to updating records as well.

So, in your code you create some records. By Default the creator of the record is the Owner. You want to change this and you modify the OwnerId column of the newly created records. You make "User X" as the Owner. Now when you run the code, you get the Error below:
System.DmlException: Insert failed. First exception on row 2; first error: INSUFFICIENT_ACCESS_ON_CROSS_REFERENCE_ENTITY, insufficient access rights on cross-reference id: []

Things to check:
  *Check that the running user (in this case you) has access to the object being operated. Check that he has CREATE privileges on the object. This is optional, but is always better to start from here.
  *Check that the Owner ie User X has CREATE permission on the object. Check that his profile has the CREATE permission on the particular object. He might not be having it, grant him permission and the issue is resolved.

 Scenario 2:
Creating or Updating an Opportunity (just for an example,  might be any object). Setting the related Account of the Opportunity.

So, let's say that you create 5 Opportunities and you set the Owner to "User X". You set the Account to "Account X". When your code tries to insert these 5 opportunities, it fails and you get the same error message.
System.DmlException: Insert failed. First exception on row 2; first error: INSUFFICIENT_ACCESS_ON_CROSS_REFERENCE_ENTITY, insufficient access rights on cross-reference id: []
Reason:
This is because "User X" does not have access to "Account X". When you try to create an Opportunity for "Account X" that he does not have access to the code fails. Either grant access to "User X" for "Account X" manually or through code and then do the Insert.

Scenario 3:
The Sharing Object.

This is a bit complex to get at. atleast for me. You might be aware that every object has its own Share object. So, Account has AccountShare and Customobj__c has Customobj__Share
When you insert or update records in this object you might receive the same error message. There are a number of reasons for this to happen.

    *If you are trying to share "Record X" with "User Y" and you yourself do not have access to "Record x", this error happens.
    *If you are trying to share "Record X" with "User Y" and "User Y" does not have access to the object (the profile level permission, create read edit delete), this error happens.
    *If you are trying to share "Record X" with "User Y" and "User Y" already has access to "Record X" this error happens.

Read and Insert records from a CSV file - Using Visualforce?

The Apex Data Loader is always there when you want to insert records into Salesforce from a CSV file. But, just in case if you don't want your users to install the Apex Data Loader and learn how to use it, then here is a simple example which tells you how to do the same using Visualforce.

Click here to view the demo.


Step 1:

Download the template from the DEMO URL above. Save the file in your desktop. Upload the file into Static Resources with the name "AccountUploadTemplate".

Step 2:

Create an Apex Class named "FileUploader". Paste the code below and save it.


public class FileUploader
{
    public string nameFile{get;set;}
    public Blob contentFile{get;set;}
    String[] filelines = new String[]{};
    List<Account> accstoupload;
 
    public Pagereference ReadFile()
    {
        nameFile=contentFile.toString();
        filelines = nameFile.split('\n');
        accstoupload = new List<Account>();
        for (Integer i=1;i<filelines.size();i++)
        {
            String[] inputvalues = new String[]{};
            inputvalues = filelines[i].split(',');
         
            Account a = new Account();
            a.Name = inputvalues[0];
            a.ShippingStreet = inputvalues[1];    
            a.ShippingCity = inputvalues[2];
            a.ShippingState = inputvalues[3];
            a.ShippingPostalCode = inputvalues[4];
            a.ShippingCountry = inputvalues[5];

            accstoupload.add(a);
        }
        try{
        insert accstoupload;
        }
        catch (Exception e)
        {
            ApexPages.Message errormsg = new ApexPages.Message(ApexPages.severity.ERROR,'An error has occured. Please check the template or try again later');
            ApexPages.addMessage(errormsg);
        }  
        return null;
    }
 
    public List<Account> getuploadedAccounts()
    {
        if (accstoupload!= NULL)
            if (accstoupload.size() > 0)
                return accstoupload;
            else
                return null;                  
        else
            return null;
    }          
}

Step 3:

Create a Visualforce Page named "UploadAccounts". Paste the code below and save it.


<apex:page sidebar="false" controller="FileUploader">
   <apex:form >
      <apex:sectionHeader title="Upload data from CSV file"/>
      <apex:pagemessages />
      <apex:pageBlock >
             <center>
              <apex:inputFile value="{!contentFile}" filename="{!nameFile}" /> <apex:commandButton action="{!ReadFile}" value="Upload File" id="theButton" style="width:70px;"/>
              <br/> <br/> <font color="red"> <b>Note: Please use the standard template to upload Accounts. <a href="{!URLFOR($Resource.AccountUploadTemplate)}" target="_blank"> Click here </a> to download the template. </b> </font>
             </center>
   
   
      <apex:pageblocktable value="{!uploadedAccounts}" var="acc" rendered="{!NOT(ISNULL(uploadedAccounts))}">
          <apex:column headerValue="Account Name">
              <apex:outputField value="{!acc.Name}"/>
          </apex:column>
          <apex:column headerValue="Shipping Street">
              <apex:outputField value="{!acc.ShippingStreet}"/>
          </apex:column>
          <apex:column headerValue="Shipping City">
              <apex:outputField value="{!acc.ShippingCity}"/>
          </apex:column>
          <apex:column headerValue="Shipping State">
              <apex:outputField value="{!acc.ShippingState}"/>
          </apex:column>
          <apex:column headerValue="Shipping Postal Code">
              <apex:outputField value="{!acc.ShippingPostalCode}"/>
          </apex:column>
          <apex:column headerValue="Shipping Country">
              <apex:outputField value="{!acc.ShippingCountry}"/>
          </apex:column>
      </apex:pageblocktable>
   
      </apex:pageBlock>    
   </apex:form>
</apex:page>


Screenshot:


Some pointers:
You can use only the standard template. Because, that's how we have done the mapping to the columns in excel and the fields in Salesforce. You can modify the mapping and use your own template.
Allowing the user to choose his own mapping is possible i believe, but may be a bit complex.
Also, we use a CSV file. So, you may have to use additional criteria if your data values itself have a comma in them (For ex: Billing Street = 'Mumbai, India ') . This would cause problems because Mumbai and India would be considered as seperate values because of the comma in between them.

Getter and setter methods - What are they?

Well, once you start using a controller or an extension you will get used to these words...

So, it is good that we understand what these methods really do..

Getter and setter methods are used to pass data from your visualforce page to your controller and vice versa..

Let's take a very simple scenario... Let's assume you want to display a textbox in your visualforce page.. When the user enters some value in this textbox and clicks on a button you want the value entered by the user in your Apex class (ie. basically your controller or extension)

So go ahead and create a simple visualforce page.. the code for this would be
<apex:page controller="simplegetset">
  <apex:form>
    <apex:outputlabel value="Enter your name here"/>
       <apex:inputtext value="{!userinput}"/>        
  </apex:form>  
</apex:page>


The Apex code for this page would be...

public class simplegetset
{
    public String userinput{get; set;}
}


Now, the variable "userinput" in your Apex class will store the value entered by the user....

Let's analyze the methods now...

Get

The "get" method is used to pass data from your Apex code to your Visualforce page.. In our example we are not passing any value.. hence, when your page loads initially the textbox will have a empty value...

So, lets modify our code and pass a default value to the textbox.. Change the Apex code as follows..

public class simplegetset
{
    public String userinput;
    public String getuserinput(){return 'John';}
 
    public void setuserinput(String userinput)
    {
        this.userinput = userinput;
    }  
}


You can now see that your page loads with a value 'John'...

Set

The "set" method is used to pass values from your visualforce page to the controller... In our example the variable "userinput" will be storing the value entered in the textbox..

Now modify your VF page as below..

<apex:page controller="simplegetset">
  <apex:form>
    <apex:outputlabel value="Enter your name here"/>
       <apex:inputtext value="{!userinput}">
           <apex:actionsupport event="onclick" rerender="display" />
       </apex:inputtext>                  
    <apex:outputpanel id="display">
        <apex:outputtext value="The name entered is {!userinput}"/>
    </apex:outputpanel>                  
  </apex:form>  
</apex:page>


The Apex code would be...

public class simplegetset
{
    public String userinput{get; set;}
}


In this example what happens is.. the variable "userinput" stores the value entered in visualforce page and passes it to the Apex code.. hence you are able to see the entered value in the visualforce page..

I guess you might understand what i am saying.. to make things simple now use the same visualforce page.. but modify the Apex code as below..

public class simplegetset
{
    public String userinput;
    public String getuserinput(){return 'John';}
 
    public void setuserinput(String userinput)
    {
        this.userinput = userinput;
    }  
}


Now, whatever value you enter the page always displays "The name entered is John".... This is because your get method always returns 'John'... but still your set method will store the value you entered in the variable "userinput"....

Monday, 15 July 2013

Salesforce delete record: 'Insufficient privileges' error?

In some organisation, user allow to delete records, but sometimes user get error message 'Insufficient privileges' although Delete button exist. What's happening? Let us analyze:

1. User able to access the record
There are few scenario:

Organization-Wide Defaults sharing setting on that object is Public Read Only or Public Read/Write; or
Sharing rule added based on record owner or criteria for Public Groups or Roles; or
User is the owner of the records; or
User in higher role hierarchy of record owner; or
User profile have "View all Data" or "Modify all Data" permission

2. User see Delete button
This is happened because:

Delete button is added in record page layout; and
User profile have permission to delete that object

3. Error 'Insufficient privileges'
The ability to delete records in Salesforce is controlled by the role hierarchy. Setting a sharing model to "Public Read/Write" alone does not give users the right to delete others records. There are 2 scenarios in which a user can delete a record:

The user attempting to delete the record is a System Administrator.
The user attempting to delete the record is the owner, or higher on the role hierarchy than the record owner.
Any other user that attempts to delete a record will receive an "Insufficient Privilege" error message.

Those below you on the role hierarchy may have read/write privileges according to the sharing model rules, however, they may not delete information from those individuals above them in that hierarchy.